Flushing a tankless water heater involves running a cleaning solution, usually vinegar or a descaling agent, through the unit to remove mineral deposits, such as lime and calcium, that can build up over time. These deposits can affect the efficiency and lifespan of the heater.
Imagine you’ve made the switch to a tankless water heater, enjoying the benefits of its energy efficiency and endless hot water. But then you notice it’s not performing as well as it used to, taking longer to heat water or making strange noises. Could it be time for a flush?
Yes, you do need to flush a tankless water heater. Over time, minerals in the water can build up inside the heater, affecting its performance and efficiency. Flushing the unit helps remove these deposits, ensuring the heater continues to function optimally.
Understanding the Importance of Flushing
Flushing your tankless water heater might not sound exciting, but it’s a maintenance task that can make a significant difference. Over time, minerals, sediment, and calcium deposits can build up inside the unit. These deposits, if left unaddressed, can reduce the heater’s efficiency and ultimately lead to a breakdown.
Flushing helps remove these deposits, ensuring your tankless water heater functions optimally.
Tools and Materials You’ll Need
Before you start the flushing process, gather the necessary tools and materials. Having these items on hand will make the flushing process smoother and more efficient:
A Bucket: You’ll need a bucket to collect water and debris during the flushing process.
A Submersible Pump: A submersible pump is essential for circulating the descaling solution or vinegar through the water heater.
Hoses: Hoses are required to connect the submersible pump to the tankless water heater and ensure the proper flow of the descaling solution.
Vinegar or a Descaling Solution: You can choose between using vinegar or a commercial descaling solution to break down and dissolve mineral deposits inside the unit.
A Pipe Wrench: A pipe wrench is necessary for securely connecting and disconnecting hoses during the flushing process.
Having these tools and materials ready in advance will help you complete the task efficiently and effectively.
Shutting Off the Power
Safety should always be a priority when working with any electrical appliance. To begin the flushing process, follow these steps to turn off the power supply to your tankless water heater:
- Electric Tankless Water Heater: If you have an electric tankless water heater, switch off the circuit breaker dedicated to the heater in your electrical panel. This step ensures that no electricity is flowing to the unit.
- Gas-Powered Tankless Water Heater: If your tankless water heater is gas-powered, be sure to shut off the gas supply. This can usually be done by turning the gas valve to the “Off” position.
Taking these precautions ensures your safety while you perform the maintenance required to keep your tankless water heater running smoothly.
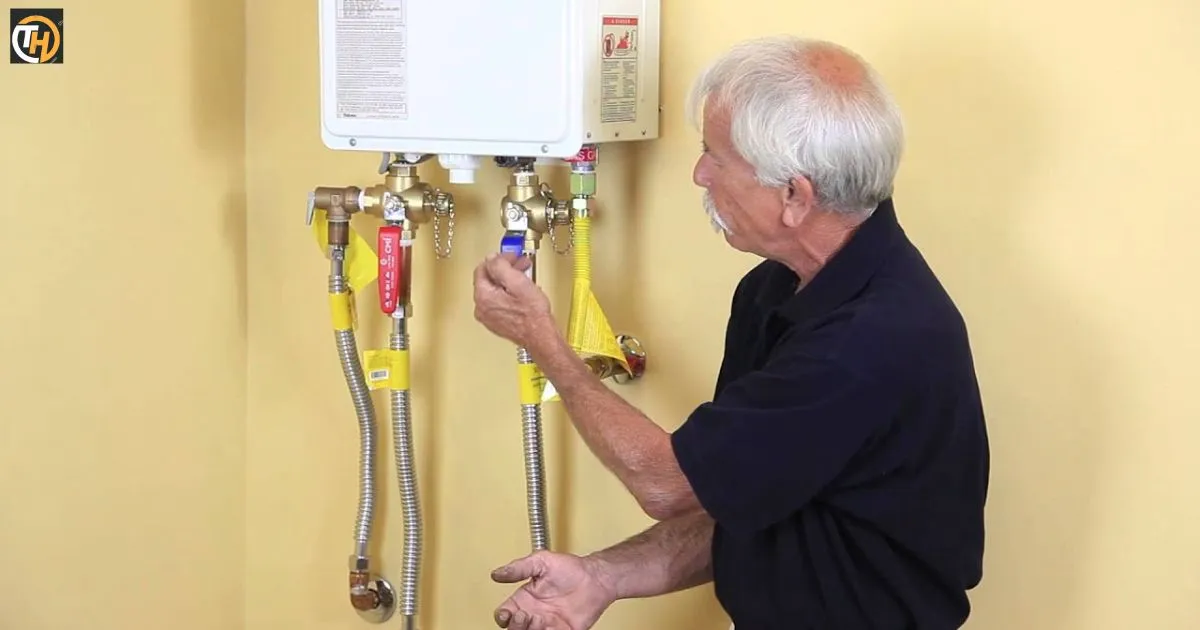
Isolating the Unit

To avoid any unexpected water flows while flushing, it’s essential to isolate the tankless water heater from the water supply. Follow these steps to do so:
- Locate the Inlet and Outlet Valves: Your tankless water heater should have both water inlet and outlet valves. These are typically located on the unit’s plumbing connections.
- Close the Water Inlet Valve: Turn the water inlet valve to the “Off” position. This valve controls the cold water supply to the heater.
- Close the Water Outlet Valve: Similarly, turn the water outlet valve to the “Off” position. This valve controls the hot water flow from the heater.
By closing both the inlet and outlet valves, you prevent any water from entering or exiting the tankless water heater during the flushing process. This isolation is crucial for a successful flush.
Connecting the Pump
The heart of the flushing process involves using a submersible pump to circulate a descaling solution or vinegar through the water heater. This solution helps break down and dissolve mineral deposits that have accumulated inside the unit. Here’s how to connect the pump:
- Attach the Hose to the Pump: Take one end of a hose and securely attach it to the submersible pump. Make sure the connection is tight to prevent any leaks.
- Prepare the Descaling Solution or Vinegar: Fill a bucket with the Descaling solution or vinegar. Ensure there’s enough liquid to circulate through the water heater effectively.
- Submerge the Pump: Place the submersible pump into the bucket filled with the descaling solution or vinegar. Submerging the pump ensures it draws the solution correctly.
- Connect the Hose to the Water Heater: Take the other end of the hose connected to the pump and attach it to the cold water inlet valve on the tankless water heater. Ensure it’s securely fastened to prevent any disconnections during the flush.
- Draining Your Tankless Water Heater Draining your tankless water heater is a crucial maintenance task to prevent mineral buildup and ensure optimal performance.
By following these steps, you’ll have the pump ready to circulate the descaling solution or vinegar through the tankless water heater, effectively removing mineral buildup.
The Flushing Process
With all the preparations in place, it’s time to begin the flushing process. Here’s how it works:
- Turn on the Pump: Start the submersible pump to begin circulating the descaling solution through the tankless water heater. The solution will flow through the unit, reaching all corners and crevices, effectively dissolving the mineral deposits that have built up over time.
- Allow Sufficient Circulation Time: It’s recommended to let the solution circulate for a duration of typically between 45 minutes to an hour. During this time, the descaling solution works its magic, breaking down and loosening the mineral deposits within the heater.
This critical step ensures that the solution thoroughly cleans the water heater, maintaining its efficiency and prolonging its lifespan.
Rinsing
After the circulation period is complete and the descaling solution has done its job, it’s time to ensure there’s no residue left in the tankless water heater. Here’s what you should do:
- Disconnect the Pump and Hoses: Begin by disconnecting the submersible pump and hoses. You won’t need them anymore for this step.
- Rinse the Water Heater: To guarantee that no traces of the descaling solution remain, use a submersible pump to circulate fresh water through the system. This will effectively flush out any remaining solution and mineral deposits.
Rinsing is a crucial part of the flushing process, as it ensures that your tankless water heater is free from any leftover descaling solution, helping it function efficiently.
Restoring Water Supply
After successfully flushing your tankless water heater, the final step involves restoring the water supply. Here’s what you need to do:
- Open the Water Inlet and Outlet Valves: Carefully open the water inlet and outlet valves that you previously shut off. This step allows the flow of water into and out of the unit, ensuring it can function properly.
- Check for Leaks: As you reopen the valves, keep a close eye on the connections. Look for any signs of leaks around the valves. If you notice any leaks, immediately shut off the water supply and address the issue before proceeding.
Restoring the water supply ensures that your tankless water heater is ready to provide hot water efficiently and without any problems.
Restoring Power

Now that the flushing process is complete and your tankless water heater is ready to go, it’s time to restore the power supply. Here’s what you need to do:
- Electric Tankless Water Heaters: If you have an electric tankless water heater, simply switch the circuit breaker dedicated to the heater back to the “ON” position. This restores power to the unit.
- Gas-Powered Tankless Water Heaters: For gas-powered tankless water heaters, check if the pilot light needs to be relit. Follow the manufacturer’s instructions for safe and proper relighting.
Restoring power ensures that your tankless water heater can operate as usual, providing hot water efficiently.
Testing the System
Your tankless water heater has gone through the flushing process, and now it’s time to make sure everything is in good working order. Here’s how to test the system:
- Open a Hot Water Faucet: Start by opening a hot water faucet, such as one in your bathroom or kitchen. Let the water run for a few minutes.
- Check for Irregularities: Pay close attention to the water flow and temperature. You should experience a steady supply of hot water without any interruptions. If you notice irregularities like fluctuations in temperature or water flow, it might indicate an issue.
- Be Patient: It’s normal for the water to take a few moments to reach the desired temperature, especially if your tankless water heater is located far from the faucet you’re using.
Benefits of Flushing
Flushing your tankless water heater is not just another household chore; it offers several key benefits. These advantages include:
Enhanced Energy Efficiency: Removing mineral deposits allows your heater to heat water more efficiently, reducing energy consumption.
Extended Lifespan: Regular flushing can prolong the lifespan of your tankless water heater, saving you money on replacements.
Continuous Hot Water: With a clean system, you’ll have a consistent supply of hot water, eliminating unexpected cold showers.
Reduced Risk of Breakdowns: By eliminating the build-up of sediment and minerals, you minimize the chances of heater breakdowns and costly repairs.
| Key Points | Description | Status |
| Gather necessary tools | Before you start flushing, collect essential tools and materials for a smooth process. | Completed |
| Shut off the power | Prioritize safety by turning off the power supply for electric heaters and gas for gas-powered units. | Completed |
| Isolate the water heater | Prevent unexpected water flow by shutting off water inlet and outlet valves. | Completed |
| Connect the submersible pump | Use a pump to circulate a descaling solution through the heater and remove mineral deposits. | Completed |
| Initiate the flushing process | Let the descaling solution circulate for 45 minutes to an hour to dissolve deposits. | Completed |
| Rinse the water heater | After flushing, rinse thoroughly with fresh water to remove any remaining solution. | Completed |
| Restore the water supply | Open the water inlet and outlet valves and check for leaks. | Completed |
| Restore power to the heater | For electric heaters, turn the power back on, and relight the pilot light for gas units. | Completed |
| Test the system | Verify the system’s efficiency by running hot water from a faucet. | Completed |
Every step has been successfully completed to ensure your tankless water heater operates at its best.
FAQs
Q: How do you flush a tankless water heater?
A: Flushing a tankless water heater involves using a submersible pump to circulate a descaling solution or vinegar through the unit.
Q: Do I really need to flush my tankless water heater?
A: Yes, regular flushing is essential to prevent mineral buildup and maintain the heater’s efficiency.
Q: Can you flush an electric tankless water heater?
A: Yes, the flushing process is similar for both gas and electric tankless water heaters.
Q: How do you flush a tankless water heater with vinegar?
A: To flush with vinegar, attach a submersible pump to circulate vinegar through the unit, dissolving mineral deposits.
Conclusion
Regular maintenance, including flushing, is key to keeping a tankless water heater running efficiently and prolonging its lifespan. While the process can be done as a DIY project, it’s always a good idea to consult with a professional or refer to the manufacturer’s instructions to ensure it’s done correctly and safely.
Remember, taking care of your tankless water heater can save you money in the long run by preventing costly repairs or premature replacement.