Maintaining the functionality of your water heater is essential for a comfortable and efficient home. A key component in ensuring its smooth operation is the thermocouple. Over time, the thermocouple can become dirty and obstructed, leading to potential issues with the water heater’s performance.
In this guide, we will explore the process of cleaning the water heater thermocouple, providing you with the necessary steps and precautions to follow. By understanding the signs of a dirty thermocouple and utilizing the appropriate tools and materials.
You can effectively clean and maintain this crucial device. So, let’s delve into the world of water heater maintenance and ensure the longevity of your appliance.
Key Takeaways
- Regular cleaning and maintenance of the thermocouple is essential for the safe and efficient operation of the water heater.
- Signs of a dirty thermocouple include a weak or unstable flame, frequent pilot light outages, and decreased hot water temperature or longer heating time.
- Cleaning the thermocouple involves turning off the gas supply, disconnecting and cleaning the old thermocouple, and securing the new thermocouple.
- In addition to cleaning the thermocouple, other maintenance tips include inspecting and cleaning the burner, flushing the tank, testing the pressure relief valve, insulating hot water pipes, and scheduling professional maintenance at least once a year.
Understanding the Thermocouple
To gain a comprehensive understanding of the water heater thermocouple, it is essential to examine how this vital component functions within the system. The thermocouple is a small device that plays a crucial role in ensuring the safe and efficient operation of a water heater.
Its primary function is to detect the presence of a pilot light flame. When the pilot light is on, the thermocouple generates a small electric current that keeps the gas valve open, allowing for the flow of gas to the burner. If the pilot light goes out, the thermocouple detects the absence of the flame and shuts off the gas valve to prevent the buildup of gas in the system.
To clean the thermocouple, start by turning off the gas supply and allowing the water heater to cool down. Locate the thermocouple, which is typically positioned near the pilot light. Gently disconnect the thermocouple from the gas valve using an adjustable wrench.
Use a clean cloth to wipe away any soot or debris that may have accumulated on the thermocouple. Take care not to apply excessive force or use abrasive materials that could damage the delicate components of the thermocouple.
Signs of a Dirty Thermocouple
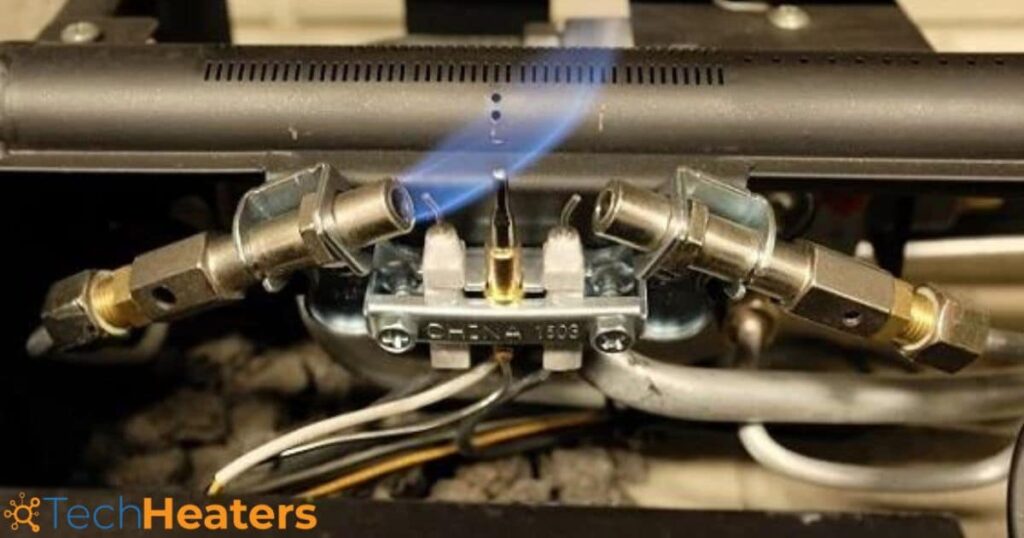
A dirty thermocouple can exhibit several signs that indicate it needs to be cleaned for the water heater to function properly. One of the most common signs of a dirty thermocouple is a weak or unstable flame.
If the flame appears yellow or flickers, it could be a clear indication that the thermocouple is dirty and needs cleaning. Another sign is if the pilot light keeps going out frequently. This can happen when the thermocouple is covered in dirt or debris, preventing it from generating enough heat to keep the pilot light burning consistently.
If you notice a decrease in the hot water temperature or if the water heater takes longer to heat up, it could be a result of a dirty thermocouple. Regular maintenance and cleaning are essential to prevent these issues and ensure proper functioning of the water heater.
By keeping the thermocouple clean, you can avoid potential damage and prolong the lifespan of your water heater. Now that you are aware of the signs of a dirty thermocouple, let’s move on to preparing for cleaning.
Preparing for Cleaning
Before beginning the cleaning process, it is important to gather the necessary tools and materials. The first step in preparing for cleaning the water heater thermocouple is to turn off the gas supply to the heater. Locate the gas valve on the water heater and turn it to the “off” position. If it has been a while since the last maintenance, it is advisable to drain the water heater to ensure optimal performance.
This is crucial for safety reasons and to prevent any accidents during the cleaning process. Next, locate the pilot and burner assembly. The thermocouple is connected to this assembly and is responsible for sensing the pilot flame.
Inspect the connections between the thermocouple and the burner assembly to ensure they are secure. If any connections are loose, tighten them before proceeding with the cleaning. With the gas supply turned off and the connections secure, you are now ready to gather the tools and materials needed for cleaning the water heater thermocouple.
The subsequent section will discuss the specific tools and materials needed for this process.
Tools and Materials Needed
The necessary tools and materials for cleaning the water heater thermocouple include a screwdriver, an adjustable wrench, a soft cloth, and a cleaning solution specifically designed for removing dirt and debris from thermocouples.
These tools will help you effectively clean the thermocouple and ensure its proper functioning. Here is a table outlining the tools and materials needed for cleaning the water heater thermocouple:
| Tools | Materials |
|---|---|
| Screwdriver | Cleaning solution |
| Adjustable wrench | Soft cloth |
To clean the thermocouple, follow these steps:
- Turn off the water heater and allow it to cool down.
- Locate the thermocouple and remove any screws or fasteners holding it in place.
- Use the screwdriver to detach the thermocouple from the control unit.
- Gently wipe the thermocouple with a soft cloth to remove any surface dirt.
- If there is stubborn dirt or debris, use steel wool or sandpaper to lightly scrub the thermocouple.
- Apply the cleaning solution to a cloth and wipe the thermocouple thoroughly.
- Reattach the thermocouple to the control unit using the adjustable wrench.
- Turn on the water heater and check the pilot flame to ensure it is working properly.
Steps to Clean the Thermocouple
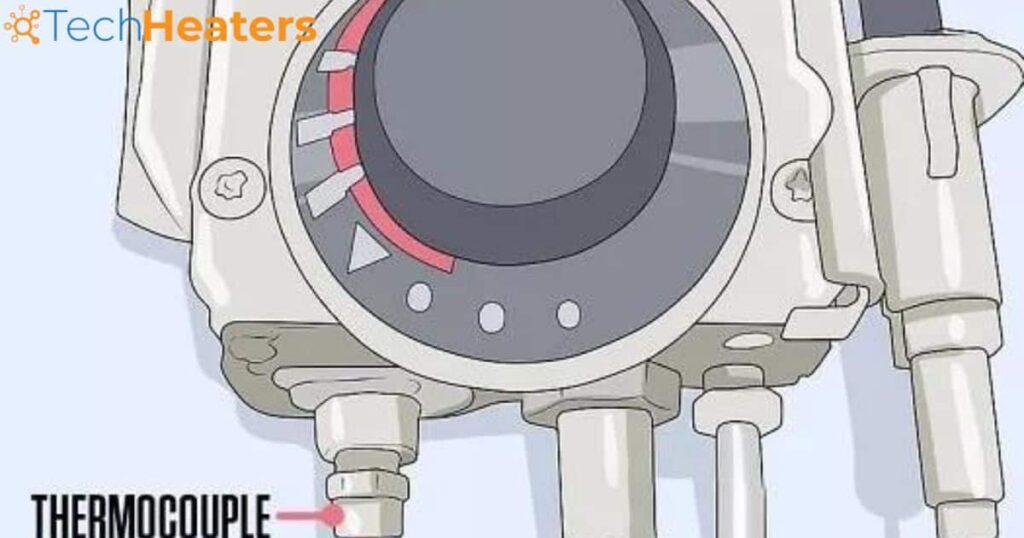
To clean the thermocouple of the water heater, follow these step-by-step instructions. Firstly, turn off the gas supply to the water heater and allow it to cool down. Locate the thermocouple, which is a small copper rod connected to the gas valve.
Disconnect the thermocouple from the gas valve by unscrewing the nut that holds it in place. Next, use a small piece of fine-grit sandpaper or a wire brush to gently clean the tip of the thermocouple. Ensure that the connections are free from any debris or corrosion.
Once cleaned, reattach the thermocouple to the gas valve and tighten the nut securely. Finally, turn on the gas supply and relight the pilot light. This maintenance step will help ensure the safe and efficient operation of your water heater. Now that the thermocouple is clean, it is time to test its functionality.
Testing the Thermocouple
To test the thermocouple, perform a simple continuity check using a multimeter. This will help determine if the thermocouple is functioning properly or if it needs to be replaced. Here are the steps to test the thermocouple:
- Turn off the gas supply to the water heater and allow it to cool down.
- Locate the thermocouple, which is usually attached to the control unit or control module of the water heater.
- Disconnect the thermocouple from the gas connections using a wrench or pliers.
- Set the multimeter to the “continuity” or “ohms” setting.
- Touch one probe of the multimeter to the end of the thermocouple and the other probe to the metal casing of the water heater.
If the multimeter displays a reading of zero or close to zero, it means the thermocouple is working fine. If there is no reading or a high reading, it indicates a faulty thermocouple that needs to be replaced.
Testing the thermocouple regularly as part of your maintenance routine will ensure the water heater operates efficiently and safely.
Reinstalling the Thermocouple
To reinstall the thermocouple, carefully align it with the gas connections and securely fasten it using a wrench or pliers. Make sure the thermocouple connections are clean and free of any debris. Once aligned, tighten the connections to ensure a proper seal.
To help engage the audience, here is a table outlining the step-by-step process of reinstalling the thermocouple in a gas water heater:
| Steps |
|---|
| 1. Turn off the gas supply to the water heater. |
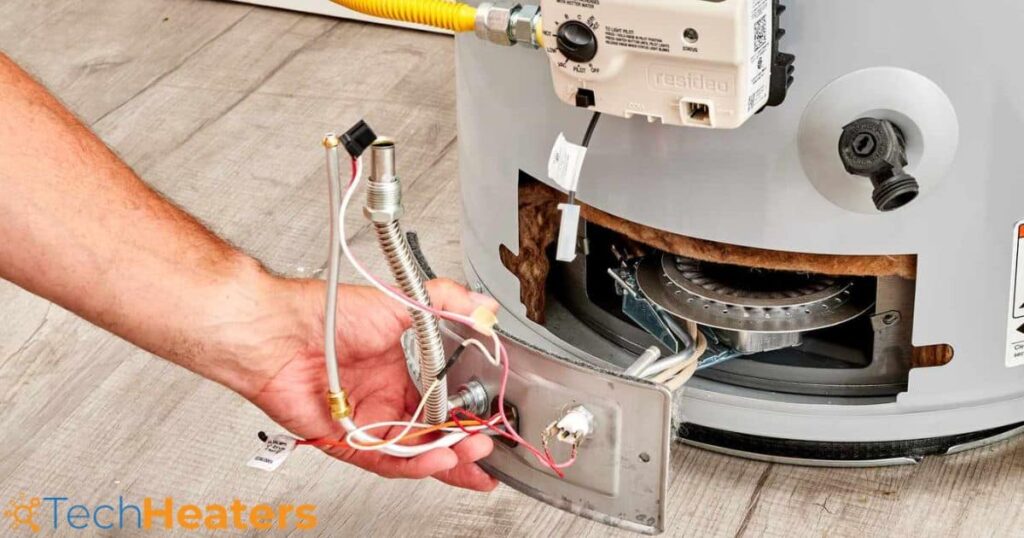
| 2. Locate the pilot tube and remove the burner assembly. |
| 3. Disconnect the old thermocouple from the gas control valve. |
| 4. Clean the thermocouple connections using a wire brush. |
| 5. Align the new thermocouple with the gas connections. |
| 6. Use a wrench or pliers to securely fasten the connections. |
| 7. Reassemble the burner assembly and pilot tube. |
| 8. Turn on the gas supply and check for any gas leaks. |
| 9. Test the water heater by igniting the pilot light. |
| 10. Monitor the burner flame for proper ignition and gas flow. |
Final Maintenance Tips
After completing the process of reinstalling the thermocouple, it is essential to perform final maintenance tasks to ensure optimal performance and longevity of your water heater. Here are some final maintenance tips to keep in mind:
- Inspect the burner: Check for any debris or buildup on the burner. Clean it using a soft brush or cloth to ensure proper combustion.
- Flush the tank: Sediment can accumulate at the bottom of the tank over time, affecting its efficiency. Drain and flush the tank to remove any sediment buildup.
- Check the pressure relief valve: Test the pressure relief valve to ensure it is functioning correctly. Lift the lever and observe if water flows out freely.
- Insulate the pipes: Insulating the hot water pipes can help reduce heat loss and conserve energy.
- Schedule regular maintenance: Consider scheduling professional maintenance at least once a year to ensure the overall health of your water heater.
FAQ’s
Can a Dirty Thermocouple Cause a Water Heater to Stop Working?
A dirty thermocouple can indeed cause a water heater to stop working. When the thermocouple becomes coated in residue, it may not generate enough voltage to keep the gas valve open, resulting in a lack of heat.
How Often Should I Clean My Water Heater Thermocouple?
The frequency of cleaning a water heater thermocouple depends on various factors such as the type of water being used and the manufacturer’s recommendations. It is best to consult the appliance’s manual or a professional technician for specific guidelines.
Can I Clean the Thermocouple Without Turning off the Gas Supply?
Cleaning the thermocouple without turning off the gas supply is not recommended due to safety concerns. It is crucial to follow proper procedures and guidelines to ensure the safety of both the individual and the equipment involved.
What Are the Potential Hazards of Cleaning a Water Heater Thermocouple?
Potential hazards of cleaning a water heater thermocouple include gas leaks, fire hazards, and personal injury. It is essential to turn off the gas supply, follow proper safety precautions, and consult a professional if unsure.
Is It Necessary to Clean Both Ends of the Thermocouple or Just One?
When cleaning a water heater thermocouple, it is important to determine whether both ends need cleaning or just one. This can be determined by observing the condition of the thermocouple and assessing any potential blockages or dirt accumulation.
Conclusion
In conclusion, maintaining a clean water heater thermocouple is essential for its proper functioning. By understanding the thermocouple, identifying signs of dirt, and following the step-by-step cleaning process, you can ensure efficient performance and avoid potential issues.
Regular maintenance is crucial to prolonging the lifespan of your water heater and ensuring a steady supply of hot water. So, keep your thermocouple clean and enjoy uninterrupted hot showers and a well-functioning water heating system.