Embarking on a road trip in your camper is a thrilling adventure, but a malfunctioning water heater can quickly turn the excitement into frustration. One common issue is the pilot light going out, leaving you in the cold literally. Fear not, fellow traveler, as we unveil the secrets to effortlessly reigniting that elusive flame.
Picture this: You’re in the midst of a chilly camping night, longing for a warm shower or a cozy dishwashing session. The protagonist in this comfort quest? The elusive pilot light. It’s not just a flame; it’s the unsung hero that transforms cold water into a comforting embrace of warmth, ensuring your camping experience remains as enjoyable as it is memorable.
A camper water heater is a crucial component that provides hot water for cooking, cleaning, and bathing during your outdoor adventures. However, lighting the pilot light on a camper water heater can sometimes be a challenging task, especially for those new to camping or using such appliances.
Getting Started: Understanding Your Camper Water Heater
Before embarking on the process of lighting the pilot light, it’s essential to have a comprehensive understanding of your camper water heater. Familiarizing yourself with key components and safety features will not only enhance your troubleshooting skills but also ensure a smoother overall experience.
- Know Your Water Heater:
- Gain a thorough understanding of the various components within your camper water heater.
- Identify safety features designed to protect both the appliance and the user.
- Identify Pilot Light Location:
- Locate the access point of the pilot light, typically positioned near the bottom of the water heater.
- Take note of any indicators or markings that guide you to the pilot light’s exact location.
By delving into these specifics, you equip yourself with the knowledge needed to navigate your camper water heater’s internal structure and efficiently address any issues that may arise during the pilot light ignition process.
Tools of the Trade: What You Need
Prepare for success by gathering the necessary tools: a long lighter, a flashlight, and, if available, your camper’s user manual. Having these essentials on hand will streamline the process and ensure a smooth rekindling.
Tools of the Trade: What You Need
- Prepare for success by gathering the necessary tools. This includes a long lighter, a flashlight, and, if available, your camper’s user manual.
- A long lighter is needed to reach the pilot light, which is often located in a recessed area.
- A flashlight will help you see what you’re doing, especially if the water heater is located in a dimly lit area.
- Your camper’s user manual will provide specific instructions for your model of the water heater.
Essential Tools
- Long lighter: This is used to reach and light the pilot light.
- Flashlight: This provides necessary lighting in dimly lit areas.
- Camper’s user manual: This provides model-specific instructions and troubleshooting tips.
Readiness is Key
- Ensure you have all the necessary tools readily available before you start. This will make the process smoother and more efficient.
- Familiarize yourself with the steps before you begin. This will help you avoid mistakes and ensure a successful lighting of the pilot light.
Step-by-Step Guide to Pilot Light Perfection

- Locate the Pilot Light: Use your flashlight to find the pilot light access point. It’s typically near the bottom of the water heater.
- Light Access Point: Identify where the pilot light is located using a flashlight.
- Bottom Placement: The pilot light is usually situated near the bottom of the water heater.
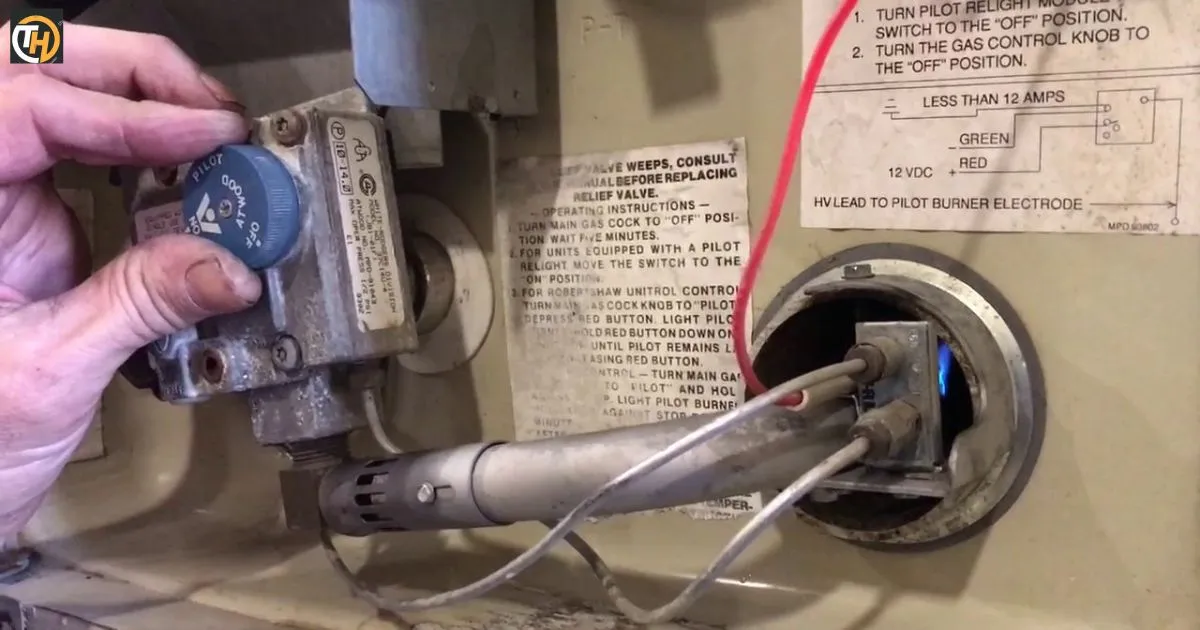
- Gas Control Valve Check: Ensure the gas control valve is set to “Pilot” and wait a few minutes to let any residual gas disperse.
- Gas Control Valve: Confirm the valve is set to “Pilot” before attempting to ignite.
- Allow for Gas Dispersion: Wait a few minutes to ensure any lingering gas dissipates safely.
- Press and Hold: Depress the control knob and simultaneously press the ignition button. This primes the system for ignition.
- Control Knob: Press and hold the control knob for the ignition process.
- Ignition Preparation: Simultaneously press the ignition button to initiate the priming process.
- Ignite the Pilot Light: With the control knob pressed, use the long lighter to ignite the pilot light. Continue holding the knob for about 30 seconds.
- Lighting Process: Use a long lighter to ignite the pilot light.
- Duration: Hold the control knob for approximately 30 seconds after ignition.
- Release and Verify: Release the control knob and check if the pilot light is burning steadily. If so, you’ve successfully conquered the pilot light challenge.
- Verification: Release the control knob and ensure the pilot light is burning steadily.
- Success Signal: A steady pilot light indicates a successful ignition.
Safety First: Troubleshooting Tips
Safety First: Troubleshooting Tips
- If the pilot light refuses to stay lit or you smell gas, it’s time to troubleshoot.
- Check for drafts that might be blowing out the pilot light.
- Ensure the gas supply is sufficient. A low gas supply can cause the pilot light to go out.
- Inspect the thermocouple for potential issues. The thermocouple is a safety device that shuts off the gas if the pilot light goes out. If it’s faulty, it might be the reason the pilot light won’t stay lit.
Troubleshooting: Address Issues
- If the pilot light won’t stay lit, there could be several reasons. It could be due to a draft, a low gas supply, or a faulty thermocouple.
- If there’s a gas smell, this could indicate a gas leak. This is a serious issue that needs immediate attention.
Professional Guidance

- Consult your camper’s manual for specific instructions on lighting the pilot light and troubleshooting common issues.
- If you’re unable to resolve the issue yourself, don’t hesitate to seek professional assistance. It’s better to be safe than sorry when dealing with gas appliances.
Here’s a table summarizing the main purpose of the article:
| Aspect | Summary |
| Title | How To Light Pilot Light On Camper Water Heater? |
| Introduction | Define the significance of the pilot light in a camper water heater, setting the stage for an informative guide. |
| Defining the Pilot Light | Explain the role of the pilot light as a crucial flame that initiates hot water production in a camper water heater. |
| Interesting Hook | Capture attention by illustrating the pilot light’s importance in providing warmth during chilly camping nights. |
| Informative Paragraph | Provide a step-by-step guide for lighting the pilot light, including locating the access point, gas control valve check, and the ignition process. |
| Tools of the Trade | Emphasize the essential tools needed for the task, such as a long lighter, flashlight, and the camper’s user manual. |
| Conclusion | Summarize the importance of a functional water heater, encourage mastery of the pilot light ignition, and highlight its role in ensuring comfort during camping. |
| Meta Description | Explore the art of lighting the pilot light on your camper water heater for cozy camping nights. Master the process and ensure warmth on your outdoor adventures. |
FAQs
How do you light a pilot light on a camper?
Locate the pilot light access point, set the gas control valve to “Pilot,” press and hold the control knob while pressing the ignition button, use a long lighter to ignite the pilot light, and hold the knob for about 30 seconds.
How do you start a water heater in a camper?
Follow the specific instructions for your camper’s water heater, typically involving setting the gas control valve to the desired temperature and igniting the pilot light using the designated procedure.
How do you start the pilot light on a water heater?
Locate the pilot light access point, set the gas control valve to “Pilot,” press and hold the control knob while pressing the ignition button, use a long lighter to ignite the pilot light, and hold the knob for about 30 seconds.
How do you start a camper heater?
Consult the user manual for your camper heater model, but generally, turn on the heater, set the desired temperature, and wait for the system to start heating. Some may also involve lighting a pilot light.
How do you manually light a pilot light?
Follow the manufacturer’s instructions: typically, locate the pilot light, set the control knob to “Pilot,” press and hold the knob while igniting the pilot with a long lighter, and continue holding the knob for a specified time until the pilot remains lit.
Conclusion
Knowing how to light the pilot light on your camper water heater is an essential skill for any camper. It ensures that you have access to hot water, which is crucial for various activities such as cooking, cleaning, and bathing. Remember, safety should always be your priority when dealing with appliances like water heaters. If you’re unsure about the process or if the pilot light doesn’t stay lit, it’s best to seek help from a professional.
By mastering this skill, you can enhance your camping experience, ensuring comfort and convenience no matter where your adventures take you. So, don’t let a little thing like a pilot light stand in the way of your enjoyment. Happy camping!