When it comes to your water heater, sometimes maintenance is necessary. One common issue that homeowners may encounter is a faulty or damaged heating element. If you’ve determined that the heating element needs replacement, you may be wondering how to remove it.
In most cases, removing a water heater element is a straightforward process, but it does require a specialized tool – a socket wrench. However, what if you don’t have a socket wrench on hand? Don’t worry; we’ve got you covered. In this article, we’ll guide you through the steps to remove a water heater element without a socket wrench.
Safety Considerations
When dealing with your water heater, it’s crucial to prioritize safety. Here are some key safety considerations to keep in mind while performing any maintenance or repair work:
Turn Off the Power and Water Supply
Before beginning any work on your water heater, ensure you turn off the power supply for electric heaters or shut off the gas supply for gas heaters. Additionally, turn off the water supply to the heater to prevent any new water from entering the tank during the maintenance.
Drain the Tank
To ensure a safe process and avoid the risk of scalding, begin by draining the hot water from the tank. Connect a hose securely to the drain valve and direct the other end to a designated and safe drainage area. With caution, open the valve, allowing the hot water to flow out smoothly.
Safety Gear
Equip yourself with safety gear, including gloves and safety glasses. These items will help protect your hands and eyes from any potential hazards.
Avoid Using Excessive Force
While removing or installing the water heater element, it’s essential not to use excessive force. Applying too much pressure can lead to damage, injury, or stripped threads.
Seek Professional Assistance
If you’re ever uncertain about any part of the process or encounter unexpected challenges, don’t hesitate to seek professional help. A qualified technician can ensure the task is completed safely and effectively.
By following these safety considerations, you can perform maintenance and repair tasks on your water heater with confidence, minimizing the risk of accidents or damage.
Before you begin gather the following tools and materials

Adjustable Wrench
An adjustable wrench is an invaluable tool in your water heater element replacement kit. Its versatility makes it a suitable alternative to a socket wrench. You can easily adjust it to fit the size of the nuts and bolts you’re working with, ensuring a secure grip and efficient tightening or loosening.
Thread Seal Tape
Thread seal tape, often referred to as plumber’s tape, is a must-have item for resealing the heating element when you’re done with the replacement. This tape creates a watertight seal to prevent any leaks or seepage. Applying it properly to the threaded connections will help maintain the integrity of your water heater system.
Replacement Element
When undertaking the task of removing the old heating element, it’s highly advisable to have a new replacement element readily available for installation. This proactive approach ensures you’re fully prepared to complete the job without unnecessary delays. Having a new heating element on hand eliminates the need for a second trip to the store and minimizes any downtime in your hot water supply.
Step-by-Step Guide
Step 1: Ensure Power Safety
Prioritizing safety is essential. For electric water heaters, start by switching off the circuit breaker, effectively cutting off the power supply. If you’re dealing with a gas water heater, locate the gas supply and turn it off to ensure safety.
Step 2: Halt Water Flow
Locate the cold-water inlet valve connected to your water heater. To prevent any water from entering the heater during the replacement process, shut off this valve.
Step 3: Safely Drain the Tank
To prevent potential scalding, it’s crucial to drain the hot water from the tank. This step can be accomplished by connecting a hose to the tank’s drain valve. Position the other end of the hose in a safe drainage area. Remove a water heater element without the need for a socket? Once everything is set up, open the valve, allowing the hot water to flow out.
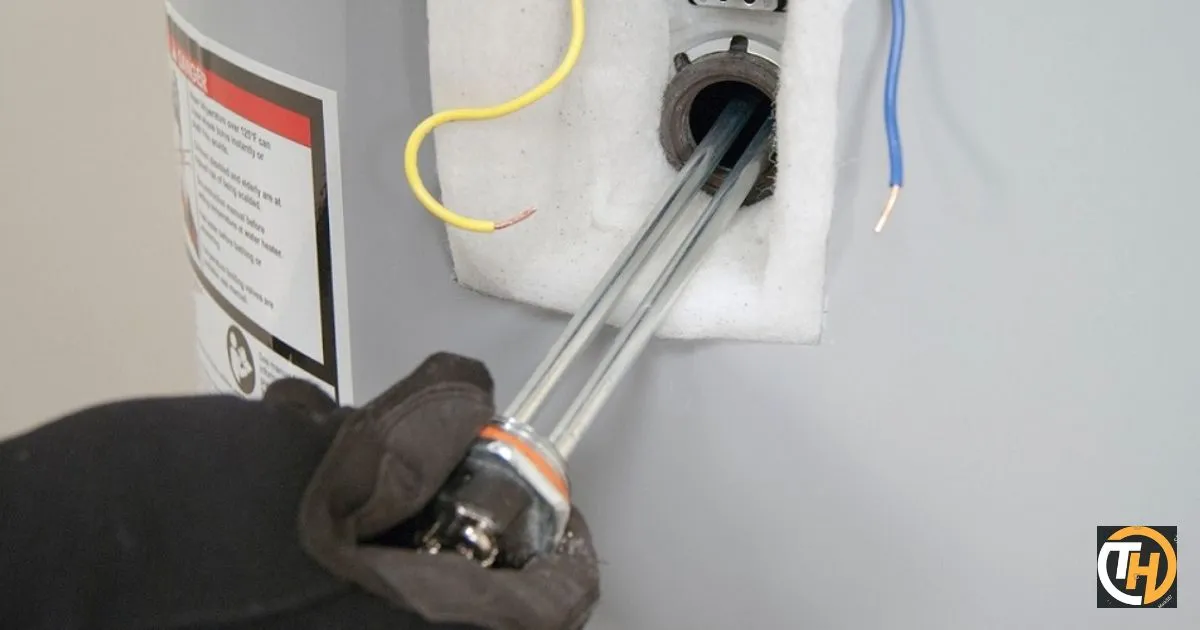
Step 4: Extract the Old Element
Now, the next step involves removing the old, malfunctioning heating element without the need for a socket wrench. To do this, take an adjustable wrench and position it over the hexagonal head of the heating element. Begin turning the wrench counterclockwise. As you turn, you’ll notice the heating element gradually unscrewing itself from the water heater. Keep turning until it’s completely free and can be removed.
Step 5: Ensure a Tight Seal
Before installing the new heating element, it’s important to wrap the threads with thread seal tape. This tape serves as a vital component, ensuring a watertight seal when you install the replacement element.
Step 6: Install the New Element
After successfully removing the old heating element without requiring a socket wrench, you can proceed to the next step. Gently insert the new heating element into the dedicated space within the water heater.
Employ your trusty adjustable wrench to firmly secure it in its position. It’s of utmost importance that the new element is adequately and securely installed to prevent any potential issues or complications down the line.
Step 7: Refill the Tank
With the new element securely in place, it’s time to refill the tank. Close the drain valve and turn the water supply back on. The tank will gradually fill up with water. After the tank is full, you can proceed to the next step.
Step 8: Thoroughly Inspect for Leaks
Inspect the newly installed heating element diligently. Look for any signs of leaks or irregularities. If no leaks are detected, your water heater element replacement has been successful. You’re now good to go and can restore power or gas to your water heater.
By following these steps, you can remove a water heater element without the need for a socket wrench. Just remember to prioritize safety, turn off the power and water supply, and take your time to complete each step carefully. If you encounter any difficulties or have concerns, it’s always a good idea to consult a professional plumber or electrician to ensure the job is done correctly and safely.
| Step | Description |
| 1 | Ensure Power Safety: Turn off the power or gas supply. |
| 2 | Halt Water Flow: Shut off the cold-water inlet valve. |
| 3 | Safely Drain the Tank: Drain hot water using a hose. |
| 4 | Extract the Old Element: Use an adjustable wrench. |
| 5 | Ensure a Tight Seal: Apply thread seal tape. |
| 6 | Install the New Element: Securely fasten the new one. |
| 7 | Refill the Tank: Turn on the water supply to fill it. |
| 8 | Check for Leaks: Inspect for any signs of leakage. |
This table provides a quick reference to the essential steps for successfully removing a water heater element without a socket.
Here are five FAQs (Frequently Asked Questions) and their concise answers regarding removing a water heater element without a socket.
FAQs
Q: Is it necessary to turn off the power or gas supply before removing the element?
A: Yes, always ensure safety by turning off the power or gas supply.
Q: What’s the purpose of using thread seal tape?
A: Thread seal tape creates a watertight seal when installing the new element.
Q: Can I drain the tank without using a hose?
A: It’s safer to use a hose to direct hot water to a safe drainage area.
Q: Is it challenging to remove the old element with an adjustable wrench?
A: No, an adjustable wrench simplifies the process of unscrewing the old element.
Q: How can I check for leaks after installing the new element?
A: Inspect for any leaks around the newly installed element to ensure a secure fit.
Conclusion
In conclusion, learning how tohttps://toolsweek.com/how-to-remove-water-heater-element-without-element-wrench/ is a valuable skill for homeowners. By following these steps, you can efficiently replace a faulty element and ensure your water heater functions optimally. Remember to prioritize safety by turning off the power or gas supply and draining the tank to avoid accidents. Using an adjustable wrench and thread seal tape simplifies the process.
After securely installing the new element, check for any leaks to guarantee a watertight seal. This DIY task can save you time and money by eliminating the need for professional assistance. With a bit of confidence and the right tools, you can keep your water heater in excellent working condition, providing a reliable supply of hot water for your home